We've all been there. You capture a perfect moment on your phone, only to find the image is disappointingly blurry, grainy, or too dark. Before you delete that memory, know this: modern technology offers powerful ways to salvage and enhance your photos directly from your mobile device. Whether you prefer a one-click solution or professional-level editing, effective tools are at your fingertips.
This guide, relevant for Nigerian smartphone users, explores four practical methods to upgrade your photo gallery. We start with the cutting-edge power of Artificial Intelligence and move to manual techniques for those who want more control.
Method 1: Harness AI to Rescue Blurry Images
The rise of Artificial Intelligence has transformed mobile photography. Unlike simple filters, an AI photo enhancer can intelligently reconstruct an image. These tools are trained on millions of pictures to rebuild lost details, reduce grain, and sharpen模糊 shapes.

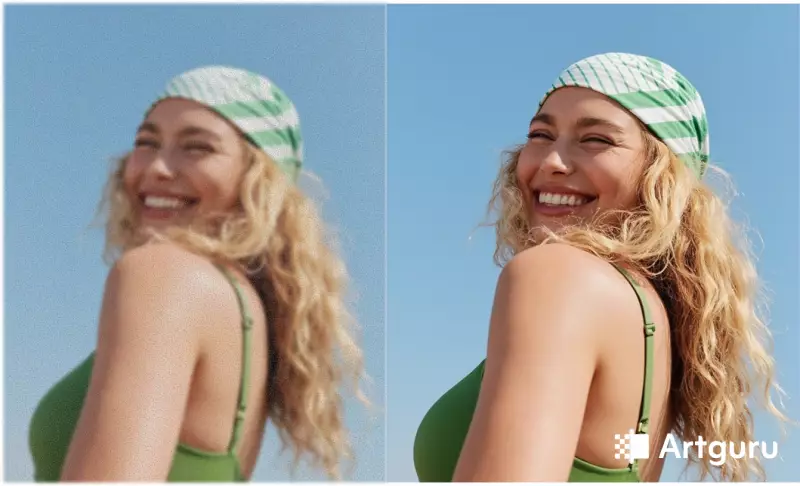
For a reliable and accessible option, consider Artguru. This tool works directly in your mobile browser on both Android and iPhone, offering key features to fix your photos.
Smart Upscaling: Have an old, low-resolution photo or a heavily cropped image? A good AI upscaler doesn't just enlarge pixels; it intelligently recreates missing details. It can increase resolution to 2K, 4K, or even 8K, making faces, textures, and text much clearer.
Instant De-blurring: This feature is ideal for photos ruined by camera shake or poor lighting. You upload the image, and the AI analyzes the flaws to restore sharpness, often achieving results that would take hours of manual editing.
Bonus Tools: Artguru also provides extras like a one-click background remover, perfect for creating profile pictures or product photos. Remember, while AI is powerful, it has limits. On a completely ruined photo, it might generate artificial details, leading to unnatural textures. It works best on enhancing decent shots, not performing impossible miracles.
Method 2: Optimize Your Camera Settings Before Shooting
The best strategy for high-quality photos is to get them right in the camera. AI works better with good source material. Before you click, take a moment to adjust your settings.
Explore Pro Mode: Don't be intimidated. Most Android phones and some iOS apps offer a "Pro" or "Manual" mode. You don't need to be an expert. Simply keeping the ISO setting low reduces grain, while adjusting the Shutter Speed can freeze motion effectively.
Use the Grid: Activate the 3x3 grid in your camera settings. Composing your shot using the "Rule of Thirds" instantly makes it look more balanced and professional.
Check Resolution: Ensure your camera is set to its maximum resolution and the native aspect ratio, usually 4:3. Some phones default to a "Full Screen" mode (like 16:9), which crops the sensor and actually lowers image quality.
Method 3: Utilize Your Phone's Built-in Gallery Editor
For everyday photo fixes, you might not need extra software. Your phone's native gallery app—like Google Photos on Android or the Photos app on iPhone—is often sufficient.
The Auto-Enhance Button: Open a photo and tap "Edit." Look for the "Auto" or "Enhance" button, often symbolized by a magic wand icon. One tap can intelligently balance exposure, contrast, and color, effectively fixing most casual snaps.
Basic Manual Adjustments: If the auto-fix isn't perfect, use the sliders to manually adjust "Brightness," "Contrast," or "Vibrance." This is the quickest path to a share-ready photo without downloading any new apps.
Method 4: Master Advanced Apps for Professional Results
If you desire professionally edited photos or need to fix specific issues like digital noise, dedicated apps are essential. Snapseed (by Google) and Adobe Lightroom Mobile are industry standards that offer deep control.
Structure & Detail: Instead of a basic sharpness filter, Snapseed offers a "Structure" tool that enhances textures in objects like fabric or wood, making the image look crisp and detailed.

Superior Noise Reduction: Lightroom excels at cleaning up grainy photos while preserving natural detail. You get precise sliders to smooth out noise completely or retain a subtle grain for a cinematic feel.
Selective Editing: Want to brighten just a subject's face while keeping a dark background? These apps allow you to use brushes or masks to edit specific areas of the image with pinpoint accuracy.
Final Verdict: Choosing Your Tool
Here’s a quick guide to pick the right method for your needs in Nigeria:
- To save blurry or low-quality shots effortlessly: Use AI tools like Artguru.
- To capture better photos from the start: Master your Camera Settings (Resolution & Pro Mode).
- For instant color and exposure fixes: Rely on the Auto-Enhance in your phone's gallery.
- For precise, artistic control: Dive into Snapseed or Lightroom.
Armed with this knowledge, you can now revisit your gallery and breathe new life into those photos you thought were lost. Published on 5 December 2025 at 7:57pm WAT, these tips remain highly relevant for anyone looking to improve their smartphone photography skills.